Kia Optima DL3: Front Suspension System / Front Strut Assembly
Components and components location
| Components |
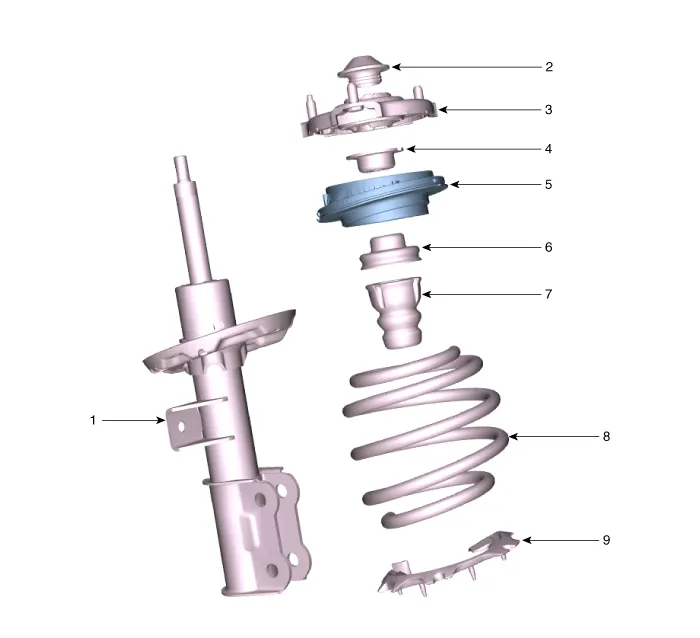
| 1. Strut assembly 2. Insulator dust cap 3. Insulator 4. Spring upper pad 5. Strut bearing |
6. Strut bearing pad 7. Bumper rubber 8. Coil spring 9. Spring lower pad |
Repair procedures
| Removal |
| 1. |
Disconnect the (-) battery terminal. |
| 2. |
Loosen the front strut upper mounting nuts (A).
|

| 3. |
Remove the front wheel and tire. (Refer to Tires/Wheels - "Wheel") |
| 4. |
Loosen the mounting bolt (A) and then remove the brake hose bracket from the strut assembly.
|

| 5. |
Disconnect the stabilizer link with the front strut assembly after loosening the nut (A).
|


| 6. |
Remove the front strut assembly from the front axle by loosening the bolts and nuts.
|

| Disassembly |
|


| 1. |
Remove the insulator dust cover (A).
|

| 2. |
Using the spring compressor, compress the coil spring (A). Do not compress the spring more than necessary.
|

| 3. |
Using SST (0K546-F6100), loosen the self locking nut.
|

| 4. |
Remove the insulator, spring pad, coil spring and dust cover from the strut assembly.
|

| Inspection |
| 1. |
Check the strut bearing for wear and damage. |
| 2. |
Check the spring upper and lower seat for damage and deterioration. |
| 3. |
Compress and extend the piston rod (A) and check that there is no abnormal resistance or unusual sound during operation.
|

| Disposal |
| 4. |
Fully extend the piston rod. |
| 5. |
Drill a hole on the A section to remove gas from the cylinder.
|


| Reassembly |
| 1. |
Install the insulator, spring pad, coil spring and dust cover from the strut assembly.
|


| 2. |
Compress and extend the piston rod (A) and check that there is no abnormal resistance or unusual sound during operation.
|
| 3. |
Using the special tool (0K546-F6100), install the self locking nut.
|
| 4. |
Install the insulator cap (A).
|
| Installation |
| 1. |
Install in the reverse order of removal. |
| 2. |
Check the alignment. (Refer to Suspension System - "Alingment") |
Components and components location Components 1. Strut complete 2. Roll rod bracket 3. Sub frame 4. Stabilizer bar 5.
Repair procedures Removal 1. Disconnect the (-) battery terminal. 2. Remove the front wheel and tire.
Other information:
Kia Optima DL3 2019-2026 Service and Repair Manual: Integrated Memory Seat (IMS) Switch
Schematic diagrams Connector and Terminal Function Repair procedures Removal When prying with a flat-tip screwdriver or use a prying trim tool, wrap it with protective tape, and apply protective tape around the related parts, to prevent dam
Kia Optima DL3 2019-2026 Service and Repair Manual: In-car Sensor
Description and operation Description The In-car air temperature sensor is built in the heater & A/C control unit. The sensor contains a thermistor which measures the temperature of the inside. The signal decided by the resistance value which changes in accordance with perceived inside temperature, is delivered to heater co
Categories
- Manuals Home
- Kia Optima Owners Manual
- Kia Optima Service Manual
- Front Axle Assembly
- Engine Mechanical System
- Cooling System
- New on site
- Most important about car
